# Hello VEML7700
```elixir
bus_name = "i2c-1"
bus_address = 0x10
Mix.install(
[
{:circuits_i2c, "~> 2.0"},
{:circuits_sim, github: "elixir-circuits/circuits_sim"},
{:kino, "~> 0.12.2"},
{:veml7700, "0.1.2"}
],
config: [
circuits_i2c: [default_backend: CircuitsSim.I2C.Backend],
circuits_sim: [
config: [
{CircuitsSim.Device.VEML7700, bus_name: bus_name, address: bus_address}
]
]
]
)
```
## Introduction
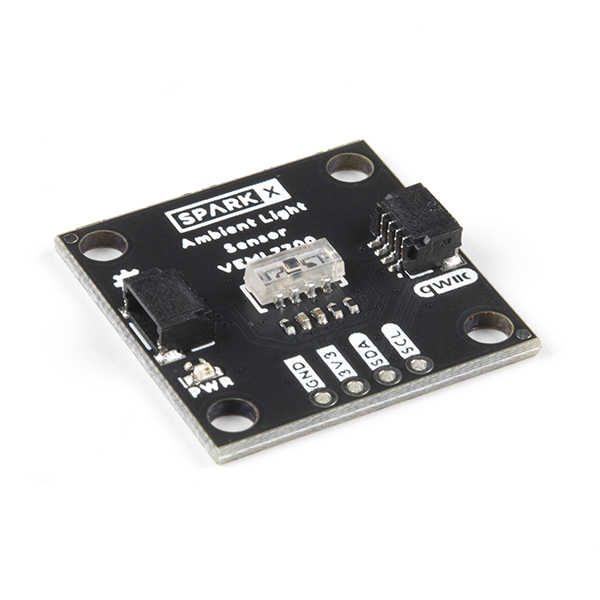
This notebook demonstrates how to ambient light in Lux out from a VEML7700
ambient light sensor board. Our [Nerves target
device](https://hexdocs.pm/nerves/targets.html) will communicate with a sensor
board using the [I2C](https://en.wikipedia.org/wiki/I%C2%B2C) protocol.
[](https://www.sparkfun.com/products/18981)
We need a few libraries for using a VEML7700 sensor in this notebook:
* The [circuits_i2c](https://hexdocs.pm/circuits_i2c) package allows us to communicate with hardware devices using the I2C protocol
* The experimental [circuits_sim](https://github.com/elixir-circuits/circuits_sim) package provides simulated I2C devices
* The [veml7700](https://hexdocs.pm/veml7700) package abstract the logic to use a VEML7700 sensor board
Running this notebook on the [Nerves Livebook
firmware](https://github.com/livebook-dev/nerves_livebook/blob/main/README.md),
you can access directly to the real sensor board.
If you don't have a real sensor board, don't worry. It's possible to work with
a simulated device that is configured in the setup section above.
The VEML7700 sensors have the same interface as the VEML6030 sensors so the
code here will work for both models.
```elixir
i2c_backend_select_form =
Kino.Control.form(
[
i2c_backend:
Kino.Input.select(
"I2C backend",
[
{CircuitsSim.I2C.Backend, "Simulated I2C"},
{Circuits.I2C.I2CDev, "Real I2C"}
]
)
],
submit: "Select I2C backend"
)
Kino.render(i2c_backend_select_form)
Kino.listen(i2c_backend_select_form, fn event ->
selected_backend = event.data.i2c_backend
Application.put_env(:circuits_i2c, :default_backend, selected_backend)
IO.puts("==> Selected I2C backend: #{selected_backend}")
Circuits.I2C.detect_devices()
IO.puts(nil)
end)
```
## Basic usage
The basic usage only takes two steps:
* start a VEML7700 server
* read output
```elixir
{:ok, veml} = VEML7700.start_link(bus_name: bus_name, bus_address: bus_address)
```
```elixir
VEML7700.measure(veml)
```
You can configure the sensor settings as needed. For details, refer to the [API reference](https://hexdocs.pm/veml7700/api-reference.html).
```elixir
VEML7700.get_als_config(veml)
```
```elixir
VEML7700.set_als_config(veml, [:als_gain_1_8])
```
## Read output every second
```elixir
defmodule AmbientLight do
use GenServer
def start_link(options) do
GenServer.start_link(__MODULE__, options, name: __MODULE__)
end
def stop() do
GenServer.stop(__MODULE__)
end
## GenServer callbacks
@impl GenServer
def init(args) do
bus_name = Keyword.fetch!(args, :bus_name)
bus_address = Keyword.fetch!(args, :bus_address)
frame = Keyword.fetch!(args, :frame)
run_interval_ms = args[:run_interval_ms] || 5000
case VEML7700.start_link(bus_name: bus_name, bus_address: bus_address) do
{:ok, veml} ->
state = %{
bus_name: bus_name,
bus_address: bus_address,
frame: frame,
veml: veml,
run_interval_ms: run_interval_ms,
start_time_ms: System.monotonic_time(:millisecond)
}
send(self(), :perform_measurement)
{:ok, state}
{:error, error} ->
{:stop, error}
end
end
@impl GenServer
def handle_continue(:schedule_next_run, state) do
Process.send_after(self(), :perform_measurement, state.run_interval_ms)
{:noreply, state}
end
@impl GenServer
def handle_info(:perform_measurement, state) do
measure_and_render_to_frame(state)
{:noreply, state, {:continue, :schedule_next_run}}
end
defp measure_and_render_to_frame(state) do
case VEML7700.measure(state.veml) do
{:ok, measurement} ->
maybe_set_fake_data(state)
light_lux = round(measurement.light_lux)
seconds = round((measurement.timestamp_ms - state.start_time_ms) / 1000)
Kino.Frame.render(state.frame, "#{light_lux} lux at #{seconds}")
{:error, _} ->
nil
end
end
defp maybe_set_fake_data(state) do
current_bus_type = :sys.get_state(state.veml).transport.bus.__struct__
case current_bus_type do
CircuitsSim.I2C.Bus ->
CircuitsSim.Device.VEML7700.set_state(
state.bus_name,
state.bus_address,
als_output: round(2200 * (1 + :rand.uniform()))
)
_ ->
:skip
end
end
end
light_lux_measurement_frame = Kino.Frame.new()
start_button = Kino.Control.button("start")
stop_button = Kino.Control.button("stop")
Kino.listen(start_button, fn _event ->
if Process.whereis(AmbientLight) do
AmbientLight.stop()
end
AmbientLight.start_link(
bus_name: bus_name,
bus_address: bus_address,
frame: light_lux_measurement_frame,
run_interval_ms: 1000
)
end)
Kino.listen(stop_button, fn _event ->
if Process.whereis(AmbientLight) do
AmbientLight.stop()
end
end)
Kino.Layout.grid(
[
light_lux_measurement_frame,
Kino.Layout.grid([start_button, stop_button], columns: 2)
],
columns: 2
)
```
## Hardware
For the curious, here is some information about the VEML7700 sensor.
* [Vishay's VEML7700 datasheet](https://www.vishay.com/docs/84286/veml7700.pdf)
* [Sparkfun's Qwiic Ambient Light Sensor Hookup Guide](https://learn.sparkfun.com/tutorials/qwiic-ambient-light-sensor-veml6030-hookup-guide)
For a hands-on Nerves tutorials, checkout this book.
[](https://pragprog.com/titles/passweather/build-a-weather-station-with-elixir-and-nerves/)